| |
Enhancements
in the EX version of the CMT Timber Cruising Software
1. Multi-Product
Variable-Length Log Data Entry Form
- You may set up
the program to optionally or automatically display the Multi-Product
Variable-Length Log Data Entry Form for a Species/Product class. This
form lets you enter a number of logs in different lengths. This function
is accessed under the “Specify Quantity Computation Methods
and Tree Measurement Fields” dialog window. Choose from one
of three options to invoke the multi-product option for the specified
row:
- On:
multi-product window will always pop-up after key parameters are entered
(e.g. DBH and total height) and multi-product information is required.
Off: multi-product window not available for the selected
entry.
Opt: multi-product window will pop-up after key parameters
are entered (e.g. DBH and total height) and multi-product information
is optional. The Computation Method must be set to a Stem Profile
in order to use the Multi-Product function.
- The <F3>
button can be used to call up the multi-product dialog window manually.
You may enter logs of different product classes for the same tree
stem. When the Multi-Product Form first comes up, program automatically
populates the first log record with the suggested log length for the
main product class. You may accept it or change it as appropriate.
PC-Cruise verifies each log entry against the product specifications.
- You may enter a
Cull segment between 2 log segments.
- Unused top portion
is lumped as topwood.
2. Reporting
Units
- The program will
permit the use of different reporting units for different products
within the same stand. Quantities are summarized for each reporting
unit.
3. Cruised
Plot Indicator
- The 8th symbol
in the CMT Default symbol library is used for displaying the cruised
points in Cruise View. This helps you tell at a glance which points
have been cruised.
4.
Additional Options for 100% Tally
- When adding stands
to be cruised using the 100% Tally method, you may set the tally interval
by using the M/C (Measure/Count) ratio field provided on the dialog
window.
- For 100% cruises,
you can set the M (measure) option to: 9999 and set the C (Count)
field to 0.
For cruises where all tree will be counted, set the M (measure) option
to: 0 and set the C (Count) field to 9999. Built-in options allow
for other ratios of measuring to counting to be chosen.
5. Measure/Count
Status
- The M/C count status
field keeps track of the total measured and counted trees for the
plot.
- A M/C tool icon
is provided to easily switch between the Measure/Count modes for adding
a tree.
- By default this
tool is not checked. If the current tree is a measured tree, then
marking the box will automatically set the next added tree to be counted.
If the current tree is counted, then marking the box will automatically
set the next added tree to be a measured tree.
6. Double
Point By Tree
- A variation of
the Double Point sampling method has been added. With the Dbl
Pnt By Tree method, all trees are counted at each point but
only a portion of the trees is measured for volume at each point.
In contrast, with the Dbl Pnt By Point method, all
trees are counted at each point and, for a fraction of the points,
all trees are measured for volume. The Dbl Point by Point method allows
you to specify a “Point M/C ratio”.
Select the desired Cruise Method in the “Add Stand” dialog
box:
- For the Dbl Pnt
By Tree method, you may specify a "Tree M/C ratio"
(ratio of volume trees to count trees). You may specify "one
tree per plot" by setting the M/C ratio to: 1/9999.
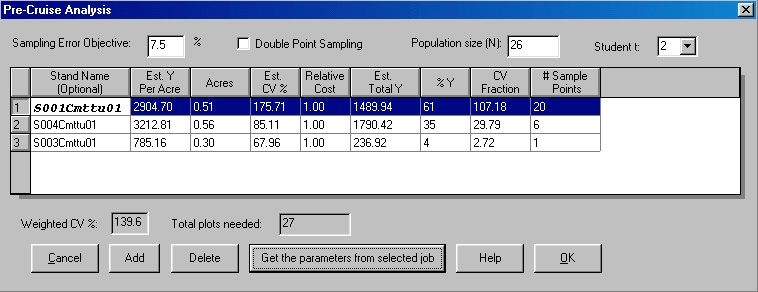
7. Pre-Cruise
Analysis
The Pre-Cruise analysis has been enhanced by adding the following fields:
- "Student
t" setting (either 1 or 2)
- "Population
Size (N:)" field for PLOT sampling.
- Fields to allow
for cost consideration in computing optimum sample size.

8. Default
VBARs
- The "Default
VBAR" and "Default VBAR 2"
setup fields have been added to the merchandise table. They are displayed
in the last two columns of the table:
- For the Dbl Pnt
By Point option, the default VBAR will be applied when the calculated
"student t" is less than the "critical t". When
the correlation criterion is met, then the computed VBAR will be used
for reporting the expanded volumes.
9. User-defined
data fields
- You may define
your own editable data entry fields at the Tract, Stand, Plot and
Tree levels. You may even specify pre-defined data values or drop-down
pick lists for these user-defined data fields. These are accessed
under the "Specify Quantity Computation Methods and Tree Measurement
Fields" dialog window:

- Click on the button
to select the layer that you want to edit. For example, to add a new
data field to the initial Tract View screen (containing Land Owner
information, etc.), select the “Tract Layer” button. An
editor screen will appear which guides you through the process of
adding the user-defined fields that you wish to add. The editor is
configured in a “wizard” style to make the process easier.
The Tract, Stand and Plot Layer User Fields Setup dialogs are blank
indicating that you can add to these existing screens, but you may
not modify the existing fields that are already present.
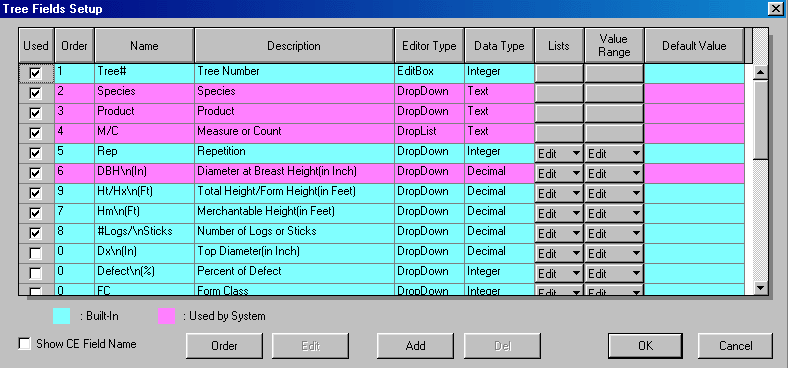
The Tree Layer is probably where you will do most of your editing
for your data collection needs. The following dialog is displayed
when you click on the “Tree Layer” button:

There are several
data fields available for control. The rows highlighted in pink are
required fields used by the Cruising software and must be used (i.e.
you cannot uncheck the “use” box). However, you may still
edit the field names, field width, display order and alignment options
for these special fields. Fields may be edited by highlighting the
desired field and clicking on the “Edit” button.
After clicking
on the edit button, an editor screen will appear which guides you through
the process of editing available fields for the user-defined field you
are currently editing. The editor is configured in a “wizard”
style to make the process easier.
The pick lists for built-in data fields such as: DBH, tree height, #Logs/Sticks,
Rep (repetitions or frequency) and FC (Form Class) may be edited.
For example, if you
regularly work with DBH = 12, 14 and 16, you may shorten the default
list to contain just 12, 14, and 16.
10. Mason
Bruce and Girard Volume Tables for 32 ft Logs
- PC-Cruise now
also provides the Girard_Bruce Volume Tables for 32 ft logs. This
option can be found under the Mesavage/Girard Table option when specifying
the computation method for a species and product.he program now also
provides the Girard_Bruce Volume Tables for 32 ft logs.
11. Stock
Table
- A stock table format
has been added to show the various quantities at different log lengths
and DBH. The new report is available under the reports option as:
“Report #21 Tract: #Trees, Quantity 1 stock Table by DBH, Products
and #Logs" as shown:
12. Security
and Fool-proofing
- A "Privilege"
setting is provided for you to specify a password for protecting the
cruise setup so that other users may not change it. The cruise leader
may set up the cruising system then lock the settings of the tree
measurement fields to prevent the essential setup from being changed
on the PC and on the PDA. A password would be required to make changes
to the system.
13. Combining Cruise Data
- The "SaveAs"
function allows the user to change the target folder for saving the
job in CE Cruise.
At the end of a cruise involving multiple cruisers, various cruisers
may put their SD cards into the cruise leader's PDA in order to copy
their jobs to the leader's PDA. The leader can then come back to the
office and use PC-Cruise to combine the jobs.
14. Virtual
Tree (a what-if tool)
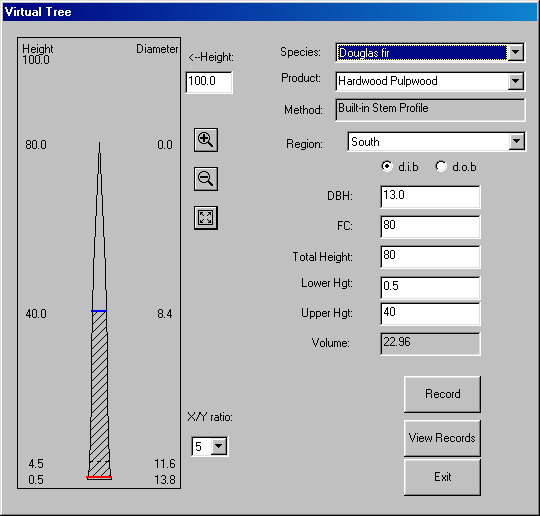
- This tool is a
volume calculator with a graphic display to help the user quickly
see the volume of a log segment by specifying the starting and ending
height values for a stem. Options are also available to specify the
d.i.b. (diameter inside bark) or d.o.b. (diameter outside bark). To
call up the virtual tree dialog, select the Cruise pull-down menu
and then select “Virtual Tree”. The following dialog is
displayed:

- First, select the
species and product for the tree. Then, specify the DBH, FC and Total
Height. Enter the lower height and upper height to define the section
of interest on the tree. Based on this information, the program displays
a simple sketch of the stem profile and shows the location of the
DBH using a dashed line.
The program displays
the bottom end of the log segment as a red line across the stem profile
to indicate the location. The top end of the log segment is shown
as a blue line. The volume of this log segment is then calculated
and automatically displayed for your reference.
A "Record"
button is provided to temporarily record your results. Click on this
button to append the volume to a temporary text file. Please note,
this file is erased when you exit and restart the PC-Cruise software.
Use the “View
Records” button to call up and display the temporary text file
containing the tree measurements and volumes you recorded during your
virtual tree session.
15. Move Plot/Point
from one timber stand to another
- A "Move"
button has been added to the "Plot/Point Information" screen:
Click this button to pop-up a window, which allows you to move the
active plot to a different stand. Specify the destination position
by selecting the target stand from the pull-down menu.
- Four options are
supported for target plot index:
Nth: Move to input sequence index.
Start: Move to start
End: Move to end
Plot Index: Specify plot index directly.
- When selecting
one of the first three options, the corresponding plot index will
be displayed for reference and cannot be changed.
If you specify a target plot number that is a duplicate with one of
the existent plots, then all of the following plots will be renumbered
automatically.
If the plot/point data is tied to a specific grid point location,
it is your responsibility to move the stand boundary on the map so
that PC-Cruise can match that grid point with the other stand in the
map.
16. Automatic shutoff when ready to move to a new Plot
- You now have the
option to have the PDA automatically turn off when you are done with
the current plot and are adding a new plot. When you get to the next
plot, turn on the PDA and continue to work with the new plot record.
Although it is easy to turn off the PDA by pressing the on/off button,
you may forget to do so and run out of power too soon.
|
|
|
|
|
|
|
|